Mostly curves <3
RESPONSE CURVES
Lets take a closer look at curves:

WHAT do the CURVES DO?
Curves basically re-map the brightness values: for example, make bright pixels brighter or darker by just adjusting the curve.

The horizontal axis is the original brightness (before editing), while the vertical is the new brightness. The tones are distributed as follows: dark tones closer to the origin, and light tones far from the origin.
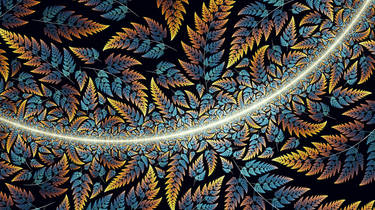
The image above shows the curves before any changes. See that before and after values are equal, since no changes were made yet.
Basically, if you drag a node up, lets say, it will make the corresponding tones brighter. For example, dragging up the top node (light tones) will make highlights brighter, and dragging down the bottom node (dark tones) will darken the dark areas. On the example below, we will brighten up the midtones too:

See how editing the overall curve increases the contrast of the fractal and hightlights the cloudy shapes.
That is the Overall curve. You can also edit the RGB and Alpha curves (use the channel menu to select one). If you want to remove all changes, use the Reset button.

Red, Green and Blue curves work in a similar manner. For example, the green curve can be used to add (or remove) green from your image - or just from the highlights or dark tones. The alpha curve will controle opacity (if "save alfa" checkbox ticked in render settings).
A FEW EXAMPLES
Lets just play around a bit, starting with this image:

We can add some red:


Play a little bit with green, adding some to highlights and removing some from darker tones to create purple shadows:


Or do something crazy with blue:


The best is to edit them all
ZOOMING IN AND OUT
The curves range is not limited by the window. In fact, you can zoom in and out. Press Alt and right mousebutton and drag up (to zoom in) and down (to zoom out).

Now you can go wild and set some crazy values if you feel like
ADDING AND REMOVING NODES
To add a node, click on any point of the line.
To remove a node, drag it through an existing node: they will merge into one.

BACKGROUND AND CURVES
You can change the background color in the background box under the curves:

The combination 0, 0, 0 corresponds to black, and 1,1,1 to white. Those are not limits though, try using negative colors and values above 1 for very interesting effects.
R=0.0 G=0.0 B=0.0 R=1.0 G=1.0 B=1.0


R=0.05 G=0.3 B=0.3 R=0.0 G=-1.0 B=0.0


By default, curves will not affect the background color. You can change it by ticking the "Apply before curves" box.
For example, below, i used curves to increase contrast of the flame. See how the background darkens as soon as i apply background before curves.
unticked ticked

See you soon with Part 3 and a bit of World Editor magic.